Governor Inslee's Executive Order on Energy Efficiency
Governor Jay Inslee has issued an Executive Order EO 14-04 yesterday that will mandate significant changes in how the residents and businesses of the state will obtain and use energy.
The State Building Code Council is tasked with:
develop, and implement to the extent possible and consistent with state and federal law, a new statewide program to significantly improve the energy performance of both our public and private buildings, taking into account existing state and utility efforts. The program must accelerate the cost-effective energy efficiency retrofit of existing buildings, with a support system that provides information, consumer protection, and assistance to businesses and homeowners. The program must ensure that all new buildings are as energy-neutral as possible, with advanced envelopes, efficient appliances, on-site generation, smart controls, and other features, where practicable.
This change will affect rental property first as evident in the third bullet point:
Support vulnerable and low-income populations through weatherization assistance, setting minimum standards for rental housing energy efficiency, . . .
I fully expect that the provisions that Governor Inslee has set forth will lead to large changes in the manner in which homes are constructed and the way that remodeling is done. I also anticipate that these changes will be relatively expensive to implement.
Anti-tip Bracket
I had a new stove delivered to the house. My wife said the installers were wonderful except . . . they didn't install the anti-tip bracket. I'll do it later, of course, but it's part of the manufacturer's recommendations. Pros should know this and get them in for their customers. 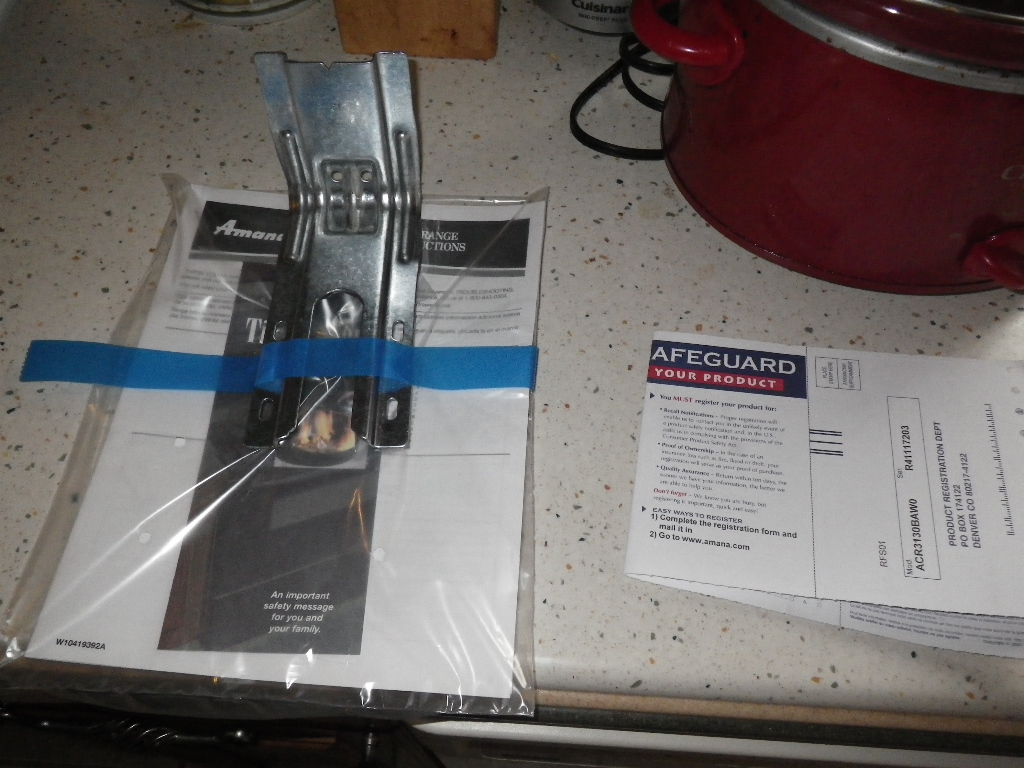 One of the many things I look for in an inspection.
For those that haven't seen one of these before, the anti-tip bracket is a device that is installed to keep a free-standing appliance from falling over. This can happen in a variety of ways, from innocent babies climbing on the door when it's down, to the elderly grasping the edge to avoid falling to . . . well, failures of human intelligence.
(The only part about the video that surprises me is that it was a young lady - doing as much work as I do around university campuses, this is the sort of thing I expected to see from a frat house.)
There are two ways to secure the stove. It's not very complicated. The one in my picture is a floor mount that has a slot for the rear leg of the stove to slide into. The second method, not used as much any more, is to use a bracket that attached to the wall with a hook on the back of the stove.
Installers don't like to spend the extra time since they always have a 'next' job to get to. Not installing it, though, voids the manufacturer's responsibility if the stove does tip.
On a side note - a daughter of mine didn't understand why I checked for them, until her daughter climbed the stove. Now she gets it. And keeps telling my grand-daughter - who's a peach - to quit it.
Underground Oil Tanks
In the last month or so, I've run into a ton of misinformation regarding underground oil tanks. Early in the month, at the ASHI-WW training session, I got involved in a conversation with inspectors from western Washington. Apparently, there are companies on the west side that will remove the tanks and perform mitigation, for $5,000-$10,000. Discovery of an oil tank on a property there often kills the deal in a dispute about who mitigates the problem. By the way, keep in mind the size of those tanks. It's actually an important number. The second occurrence was on the Idaho side of the line. Similar deal, oil tank was present (and in use with a converted coal-burner now acting as the oil-fired boiler.) The agent was concerned because, in her investigation she had contacted the City of Moscow, who referred her to the Idaho Department of Environmental Quality (DEQ) and said that there were the folks that managed the decommissioning of underground oil tanks. Folks, any time the DEQ gets involved the price tag goes up. It's the nature of what they do. In this case though, the City of Moscow gave bad advice, the same bad advice that the Washington home inspectors have been getting.
First, a little history . . . .
Above Ground and Underground Oil Tanks
These tanks store the oil that is - or was - used to fire the furnace in the house. Depending on the region, these tanks could be above or below ground. Above ground tanks made for easier monitoring but the home heating oil has a tendency to 'jell' in extreme cold so a means of keeping the oil liquid and flowing was a necessity. The above ground tanks were easy to deal with when the homeowner eventually converted from oil to gas or electric heating. Empty them out and haul them away.
Underground oil tanks poses separate issues.
There are thousands of unused underground residential heating oil tanks in existence and many still contain heating oil. These tanks are typically 300 to 500 gallons in size and made of 12 gauge steel (about 1/8 inch thick). They average about 30 years before corrosion makes them prone to leaking, but the life of individual tanks varies widely depending on the properties of the surrounding soil.
These tanks were often just abandoned in place, the only clues that they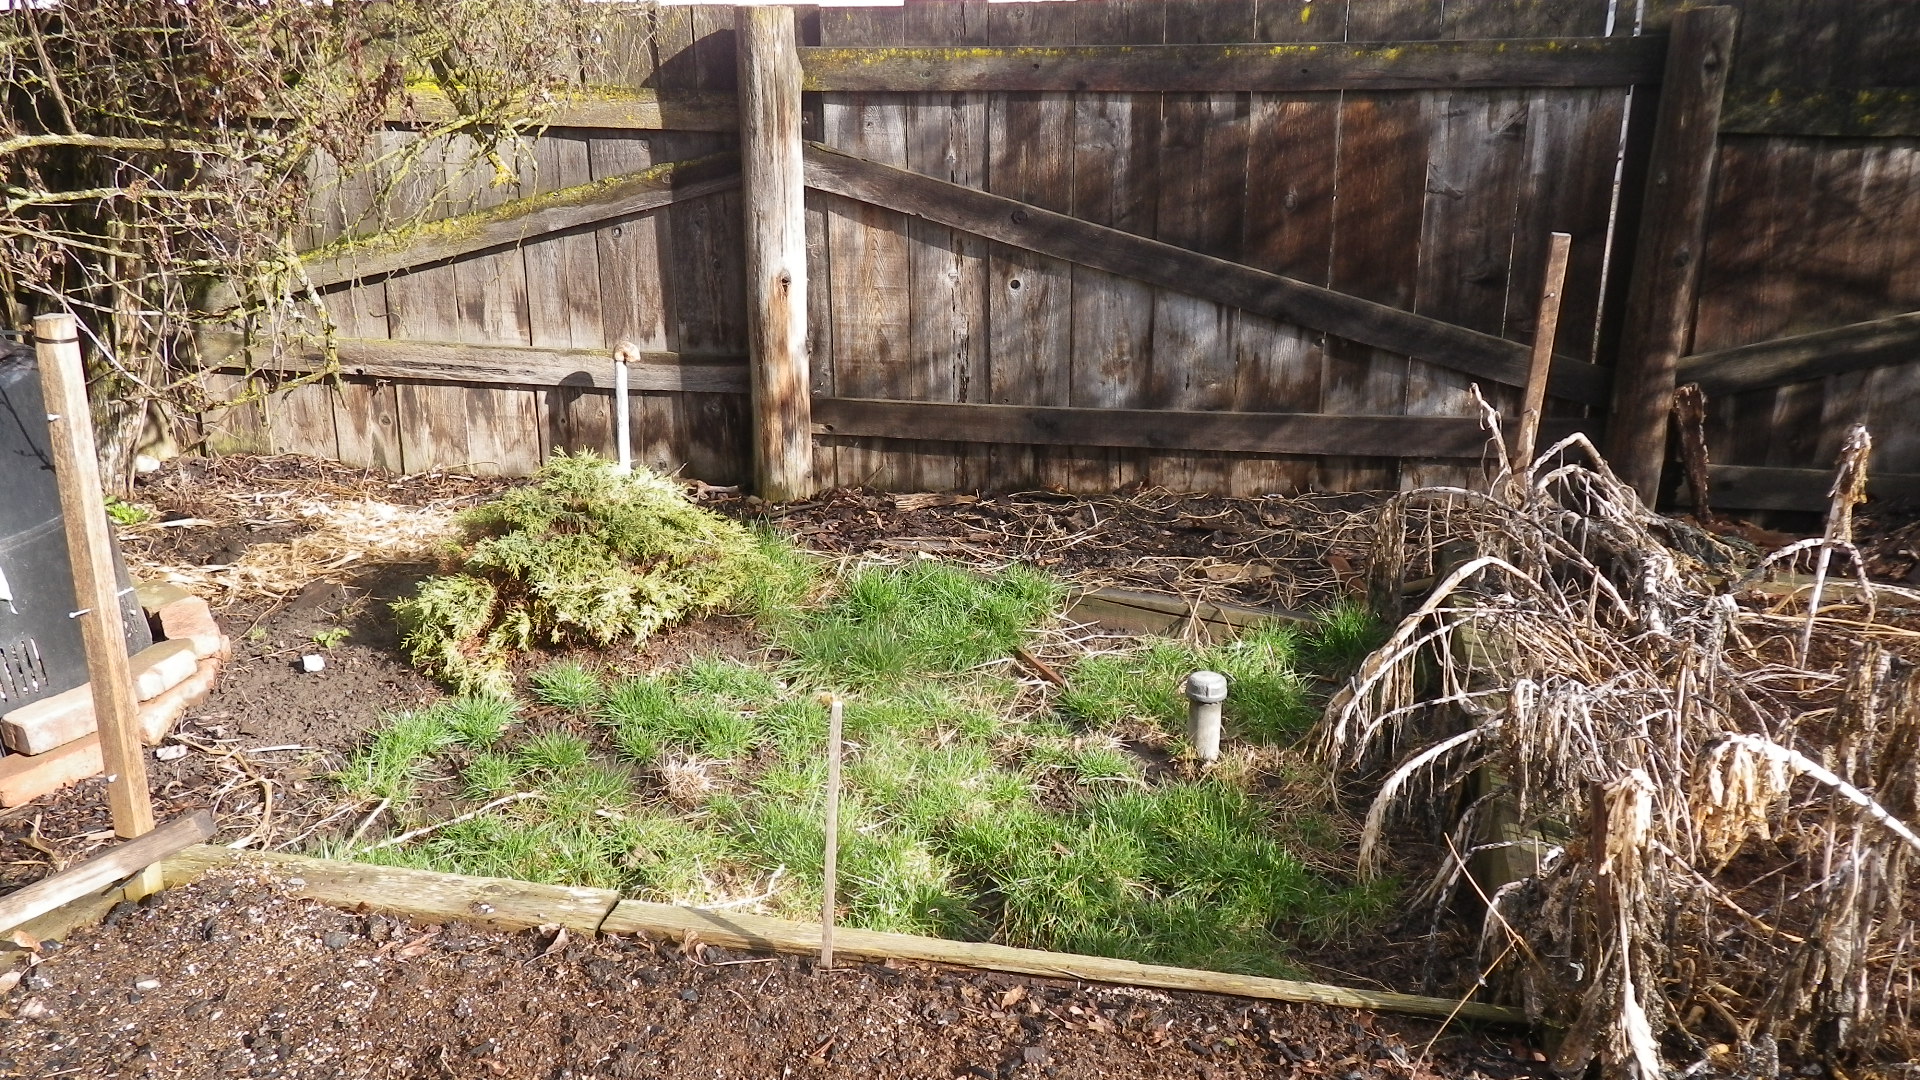 still exist, a copper feed line, or a breather vent, or the fill cap. Most of the tank, ranging in size from 200 to 500 gallons, are hidden from view. Even the pieces above the ground on the exterior - the fill pipe and breather vent - might be obscured by vegetation. In short, they can be really difficult to identify.
Under Washington State regulations, the home inspector is required to "Report any evidence that indicates the possible presence of an underground storage tank."
Myths
Myth 1 - The EPA regulates underground storage tanks so homeowners need to follow their regulations
This is the source of most of the confusion. Remember when I said to keep the tank sizes in mind above? Yep, they're important. The EPA regulates fuel storage tanks that are larger than 1100 gallons. Home heating oil tanks are specifically excluded statutorily from EPA regulation (with a large caveat that once the tank leaks and reaches a body of water, you've got a huge problem.) The EPA site has this statement - "Tanks used for the storage of heating oil for consumptive use on the premises where stored are excluded from federal UST regulations. However, state or local regulatory agencies may regulate these tanks."
Myth 2 - Washington State, Idaho State, Regulate Underground Storage Tanks
They do - in exactly the same way the EPA does. Again, the threshold for both states for regulating UST's is 1100 gallons. The State of Washington has a handy little flyer that will lead you through the process. Quoting Washington State, "Neither the federal government nor Washington State regulates the use or operation of residential heating oil tanks."
Since I live on the border between two states, I get to check everything twice. Sure enough, Idaho has a similar flyer, a little longer (head for page 6 - that's where you'll find the stuff for homeowners) that expressly states. "Some kinds of USTs are not covered by these regulations: Farm and residential tanks of 1,100 gallons or less capacity holding motor fuel used for noncommercial purposes."
Myth 3- A leaking oil tank is a huge liability to the homeowner
This one is partially true but only under certain circumstances. I'm going to use the Washington State Department of Ecology answer for this one as it is the most straight-forward. You are not required to report minor spills or leaks. They specifically defined a minor spill as ". . . those that affect only the soil near the tank."
The point where liability becomes a major concern is when one of two events occur: first, the spill contaminates a water source, whether it is a natural body of water such as a stream, river, lake, or well; and, second, if the spill impacts a neighboring property and contaminates it. There are ways to manage these risks if you have underground oil tanks on your property. Both states maintain programs to assist homeowners with insurance that would likely be impossible to obtain otherwise.
Washington State has an insurance program for homeowners - it's free but not transferrable. Go to the Pollution Liability Insurance Agency to get the details.
Idaho has a similar program but it's not free. There is a $25 annual fee to access the services at the Idaho Petroleum Storage Tank Fund
Myth 4- My underground oil tank is not in use. I have to remove it.
Maybe, but probably not.
The places to check on exactly how you are obligated to handle a tank decommissioning are the local building department or the Fire Marshall's office. I'd contact the Fire Marshall first as they usually have a better idea of the local regulations than the building departments, especially in smaller locales.
You are required, if the tank has been out of use for more than 1 year, to decommission it.
You have two options for decommissioning. The first is removal and this is by far the most expensive option. The second is to fill and abandon in place. Let's look at both.
Removing the Tank
First, understand that this is generally not required by law. Most municipalities realize the expense involved. Also, tanks that were accessible in the past may be hard to reach with the necessary heavy equipment now that the neighborhood has filled in and the landscaping has matured.
Both state environmental department - DEQ in Idaho, Ecology in Washington - recommend this option. Their argument is that it is easier to identify leaks this way (which they will then likely make you mitigate at your cost!) and that some mortgage lenders or insurers will want the potential hazard addressed. On the first point, they have a vested interest in the cleanup process.
The second is a case by case process. A properly decommissioned tank that has been fully documented to meet the applicable regulations probably will not trigger a problem for you in the loan process. The key is the documentation.
Leaving the Tank in Place
This is a popular method to handling oil tank issues due to the reduced cost.
First, a warning. You can't just leave the tank and not do anything. Old tank will rust and they are subject to floating out of the ground in areas with high water table and to collapsing from rust. Usually that collapsing is encouraged by an unsuspecting soon-to-be emergency room visitor when they walk or play above it.
Decommissioning underground oil tanks requires a few steps. The early steps are the same for removing the tank.
- Pump all remaining oil from your tank
- Clean out any sludge in the bottom of the tank.
- Remove or cap all lines.
Here things separate. With removal, you uncover, lift out, and check for contamination before backfilling.
Abandoning in place requires a non-compressible, leak-proof fill material. Commonly, we'll see a weak cement slurry, sand, or foam. Personally, I favor the weak sand slurry. It's the same material that many utilities use to backfill trenches for gas line, fiber optics, etc.
Before You Begin
Whichever option you choose, make sure you check with the local jurisdictions first. You will almost certainly need to obtain a permit in a larger city. Smaller cities and towns may not require it but check anyway. You may discover that they have useful information regarding soil structures and local hazards that will be helpful in making a rational decision.
Hire a company that specializes in underground oil tanks. Bob the local handyman is probably not your best option for this project. Check to make sure that they carry the appropriate licenses and that they are insured, both for the tank services they are providing and also for general liability for any damage they might accidently cause.
After You're Done
Maintain a paper trail of all the work that was done, by whom, in a file. To document decommissioning of the tank, the property owner should retain a copy of the any reporting forms used by the local municipality, any permits, as well as all receipts, certifications (including those of the contractor that you wisely verified), and written materials associated with the project.
Make a copy of the file for yourself, and when you place the home on the market, a copy for your Realtor.
Railroad tie retaining walls
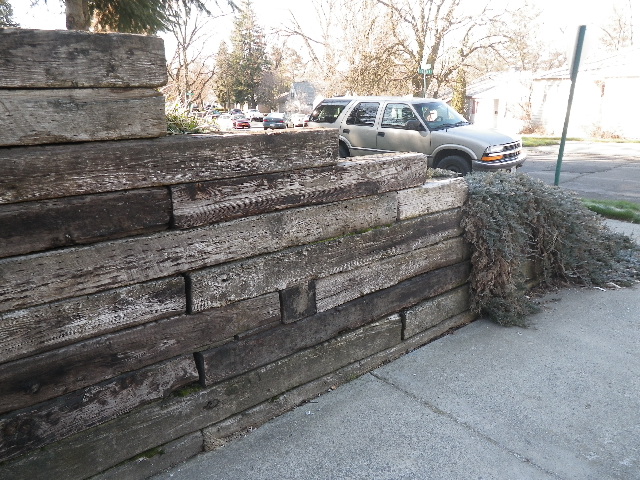 In Pullman and Moscow both, a ‘natural-look’ trend using railroad tie retaining walls took place from the mid-1980’s to about 2000, when masonry block supplanted the trend. The advantage of the railroad ties was the number of them dropped onto the market as local rail lines got torn up and the creosoted wood was nearly given away.
As is usually the case, the contractors that first started using the ties had no idea of what a wall constructed of wood should look like. Mostly, they pretended that it was just like a concrete wall. They stacked the ties, drove spikes through them vertically and—viola’—counted it as good.
It wasn’t. The railroad ties are prone to rotating and the spikes aren’t enough to resist the motion. Add to that the ground pressure, especially when the native loess around here gets wet, and the retaining walls tend to pick up a lean pretty quickly.
There’s a way to fix the issue, though. At the time you build the wall, you include tiebacks. Tiebacks can be made with steel rods and use anchor bolts to flat plates at the outside of the wall. A more attractive solution that works equally well is to use the railroad ties themselves as the tiebacks by turning an appropriate number of them perpendicular to the wall, extending into the hillside you are retaining.
If you look at the railroad tie retaining wall in the picture, you can see a tieback in the lower middle part of the picture where the end profile of the tie is visible.
No, I can’t tell you the appropriate number of tiebacks – that is known as engineering and I’m not qualified. As an inspector, I recognize when this has been done (and hasn’t, obviously) and point it out to the client.
Now, for the other problem with using railroad ties in retaining walls, at least in Pullman and Moscow—the ties are a multi-story hotel for carpenter ants.
The creosote coating will keep them from penetrating the surface of the wood but any cut ends or sections that split will provide an entry point. Once inside, the carpenter ants will set up house. Unlike most other wood destroying organisms in the Pacific Northwest, the ants don’t eat the wood. They excavate and create shelters.
While their presence in the wall will weaken it, they’re not yet a threat to your home until they attempt to colonize it in the same manner they took over the railroad ties. As part of a home inspection in Washington State, the inspector is required to inform you of potential conditions conducive to this type of infestation. Note the difference . . . potential. Just because the condition exists, it does not automatically follow that an infestation is imminent.
It would be prudent to have a professional keep an eye on the potential for you and, if it’s a concern, provide treatment options. A pair of companies I like are Sunpest and Hayden Pest Control. {Disclaimer-Sunpest helps me with my dandelion issues.}
Railroad tie retaining walls are an attractive landscaping feature but, when buying a new home, look for the signs (or make sure your inspector looks) of good construction and be mindful of the pest issues. Otherwise, enjoy the natural beauty they bring.
Washinton State Building Code Council
Spending the day in Seattle to attend a meeting of the Washington State Building Code Council, where, odd as it seems, I get to be the public representative. On today's agenda, we have two emergency rules for fire protection for schools and another for townhouses. These are issues that the Council has been working through for the last six months and I think we have some rules now that will gather consensus in both the Council as well the affected stakeholders.
The meeting before the SBCC is the Building, Fire, and Plumbing sub-committee is considering a host of rule changes for the next year. Many of the items are actual clarifications of existing code and those will likely proceed smoothly. Architects and design professionals will see the biggest change.
One that I find very interesting is a proposal to mandate third-party testing of new homes for the testing of the ductwork. This one is more likely to have a direct impact of local and small builders.
Currently, the mechanical contractor is able to perform this testing on their own systems. The request for the change comes for a home performance company and the WSU Energy Program. I find it interesting in the presumption that the contractor is automatically assumed to be corruptible while the third party tester would not be.
From a more practical point of view, I am concerned that this will greatly increase the cost of the testing which will then be passed down to the next homeowner. I'd like to be sure that we have a problem with fraud before we arbitrarily increase builder, and ultimately, consumer costs.
Inspecting dryer vents should be as dull as doing laundry
 Inspecting dryer vents should be as dull as doing laundry but, unfortunately, sometimes isn't. It doesn't take much effort to lift the flaps on the vent termination if it is somewhere near ground level but if it's on the roof or high on a second floor wall, the inspector won't be able to reach it for inspection. Adding to the problem is that the inspector is supposed to check the condition and length of the exhaust piping but not required to comment on the interior of the line. It's worth doing both.
I ran into the height problem late last week. If you look just to the right of the dormer, you can make out the termination points for the laundry vent and the dryer exhaust. The exhaust is on the right and is gapped slightly open. Since I knew the dryer wasn't running, I grabbed binoculars and could see the lint piled high at the opening.
By now, most homeowners have seen/read/heard that a clogged dryer line can cause a fire. When the dryer is operating, the designers expected the heat to flow out the exhaust line and dissipate. If the line is partially or fully plugged, this out-flow is restricted, increasing the heat at the dryer. And the lint? It counts as a combustible material.
But there is a second problem with clogging the pipe. What happens to the water? You know, all that moisture in the damp exhaust that makes those billowing clouds of steam in winter?
If you said it gets trapped in the line, you win an award. Feel free to celebrate because that's exactly what happens. I hit the attic in the house above and found wet insulation. First instinct is to start 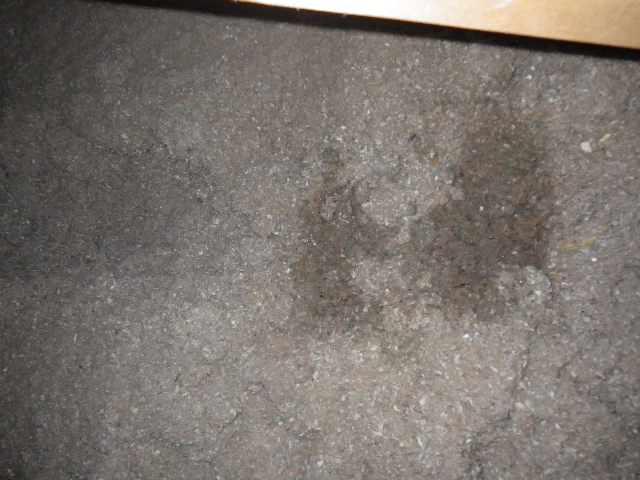 looking up for the source of the water. Not a sign of moisture on any of the sheathing or framing materials.
I reach down and touch it. Yep, definitely wet.
Then I looked to the right, toward the exterior wall. Another wet spot and, finally, the light goes on. The water wasn't coming from above. It was getting forced into the attic space by the dryer below.
The vent piping was plugged and the excess moisture was blowing through every joint in the piping. (They had used duct tape for the joints - another bad idea as it won't hold.)
I checked the OSB sheathing. It was wet but hadn't begun to develop mold or lose integrity. Given another year, this would have transitioned from a moderate problem to a big problem.
The solution for my client was two-fold. First, get the dryer vent line cleaned. Second, make sure it meets the current best practices.
The solutions for dryer line blockage are pretty straight-forward and industry recognized. The pipe material should be rigid or semi-rigid metal ducting (NOT the white vinyl and preferably not the ribbed Mylar), have a length of no more than 25 feet (not counting turns-turns reduce the allowable length because they slow air flow), and vent to the exterior of the home. You shouldn't use screws to connect segments of pipes (lint gets captured on the screws), use an approved heat tape for joints instead of duct tape, and the point of exhaust should not have a screen. Easy. Not done correctly often but easy.
Inspecting dryer vents should be on your annual to-do list.If you have a vertical run that terminates on the roof, think about doing it more often. Clean it often, at least every year. It's better for you home and -added bonus - the improved efficiency will save you money.
Pregnant? New Home in the Country? Please - test your well for nitrates.
“I have a daughter in her childbearing years,” Brender said. “If she were on a private well, I would tell her to have her well-water tested or drink bottled water.”
There's a powerful emotional reason for her to encourage you to test your well for nitrates. That quote is from an article from NBC News about a rash of birth defects in the Yakima area. The children affected have anencephaly, a condition in which they’re born missing parts of the brain or skull.
The CDC hasn't issued a reason for the sudden rash, or cluster as they phrase it, of birth defects, but they also admit that they haven't done the kind of intense in-person and in-place survey likely to find an obscure cause, something that might be as simple as they all purchased produce from the same farmer.
Yakima is a major growing area in Washington State, especially for fruits and vegetables while the regions to the East, the Palouse tend more towards grain and legumes. Still, they share a commonality - fertilizers and pesticides.
Research has shown that there are potential links between anencephaly and exposure to molds and to pesticides, Ashley-Koch said. Central Washington is a prime agricultural area that produces crops from apples and cherries to potatoes and wheat, which may require pesticides that contain nitrates.
So, if you are in a young family, planning on children and buying a home with a private well, please spend the $75 (or thereabouts - I haven't priced it recently) to get the well tested.
You never know - the money you spend to test your well for nitrates may end up being the best investment you've ever made for your children.
Some days, I don't inspect houses. . .
And now, for something totally different. A restaurant. They're always interesting. Sometimes, though, you see stuff and you scratch the joint from the "favorite eateries" list. Don't think that will happen today. Just a note - there are no state standards for commercial inspections. When Washington passed the Home Inspector Licensing law and the regulations wee written, the limit was set at 4-unit buildings to comprise residential construction.
Commercial inspections usually follow ASTM standards but can be modified by any of the parties to include more or less information. As an example, I do ADA (American with Disabilities Act) surveys to help businesses stay in compliance with federal law. The ASTM standard specifically excludes this type of work but nothing prevents me from performing it - or charging for it. It's an extra fee.
Motivational Monday
Hello, Cold White Stuff
Snow and adolescence are the only two problems that disappear if you ignore them long enough. ~Earl Wilson
When it snows, you have two choices: shovel or make snow angels. ~Anonymous
A lot of people like snow. I find it to be an unnecessary freezing of water. ~Carl Reiner
Note to self - play with the grandkids and make some snow angels - soon, before they grow too big and think it's too dumb.
Have a GREAT week!
Paul
So what happens if it DOES snow?
 One advantage of living in Asotin is that the whole Lewis-Clark valley is considered to be a 'banana belt'- we're normally 10 degrees warmer than the surrounding prairies.
We're also a desert. The average rainfall in Lewiston, Idaho is about 13 inches per year. Pullman get about 20 inches which makes it a semi-arid desert but the great soil in the Palouse hold water well and allows for dry land farming. A lot of their moisture happens this time of year, in the form of snow.
In the valley, we snicker. Most of the time, if we get 'snow', it's a dusting and we broom it off as we get on our way. Very little fuss.
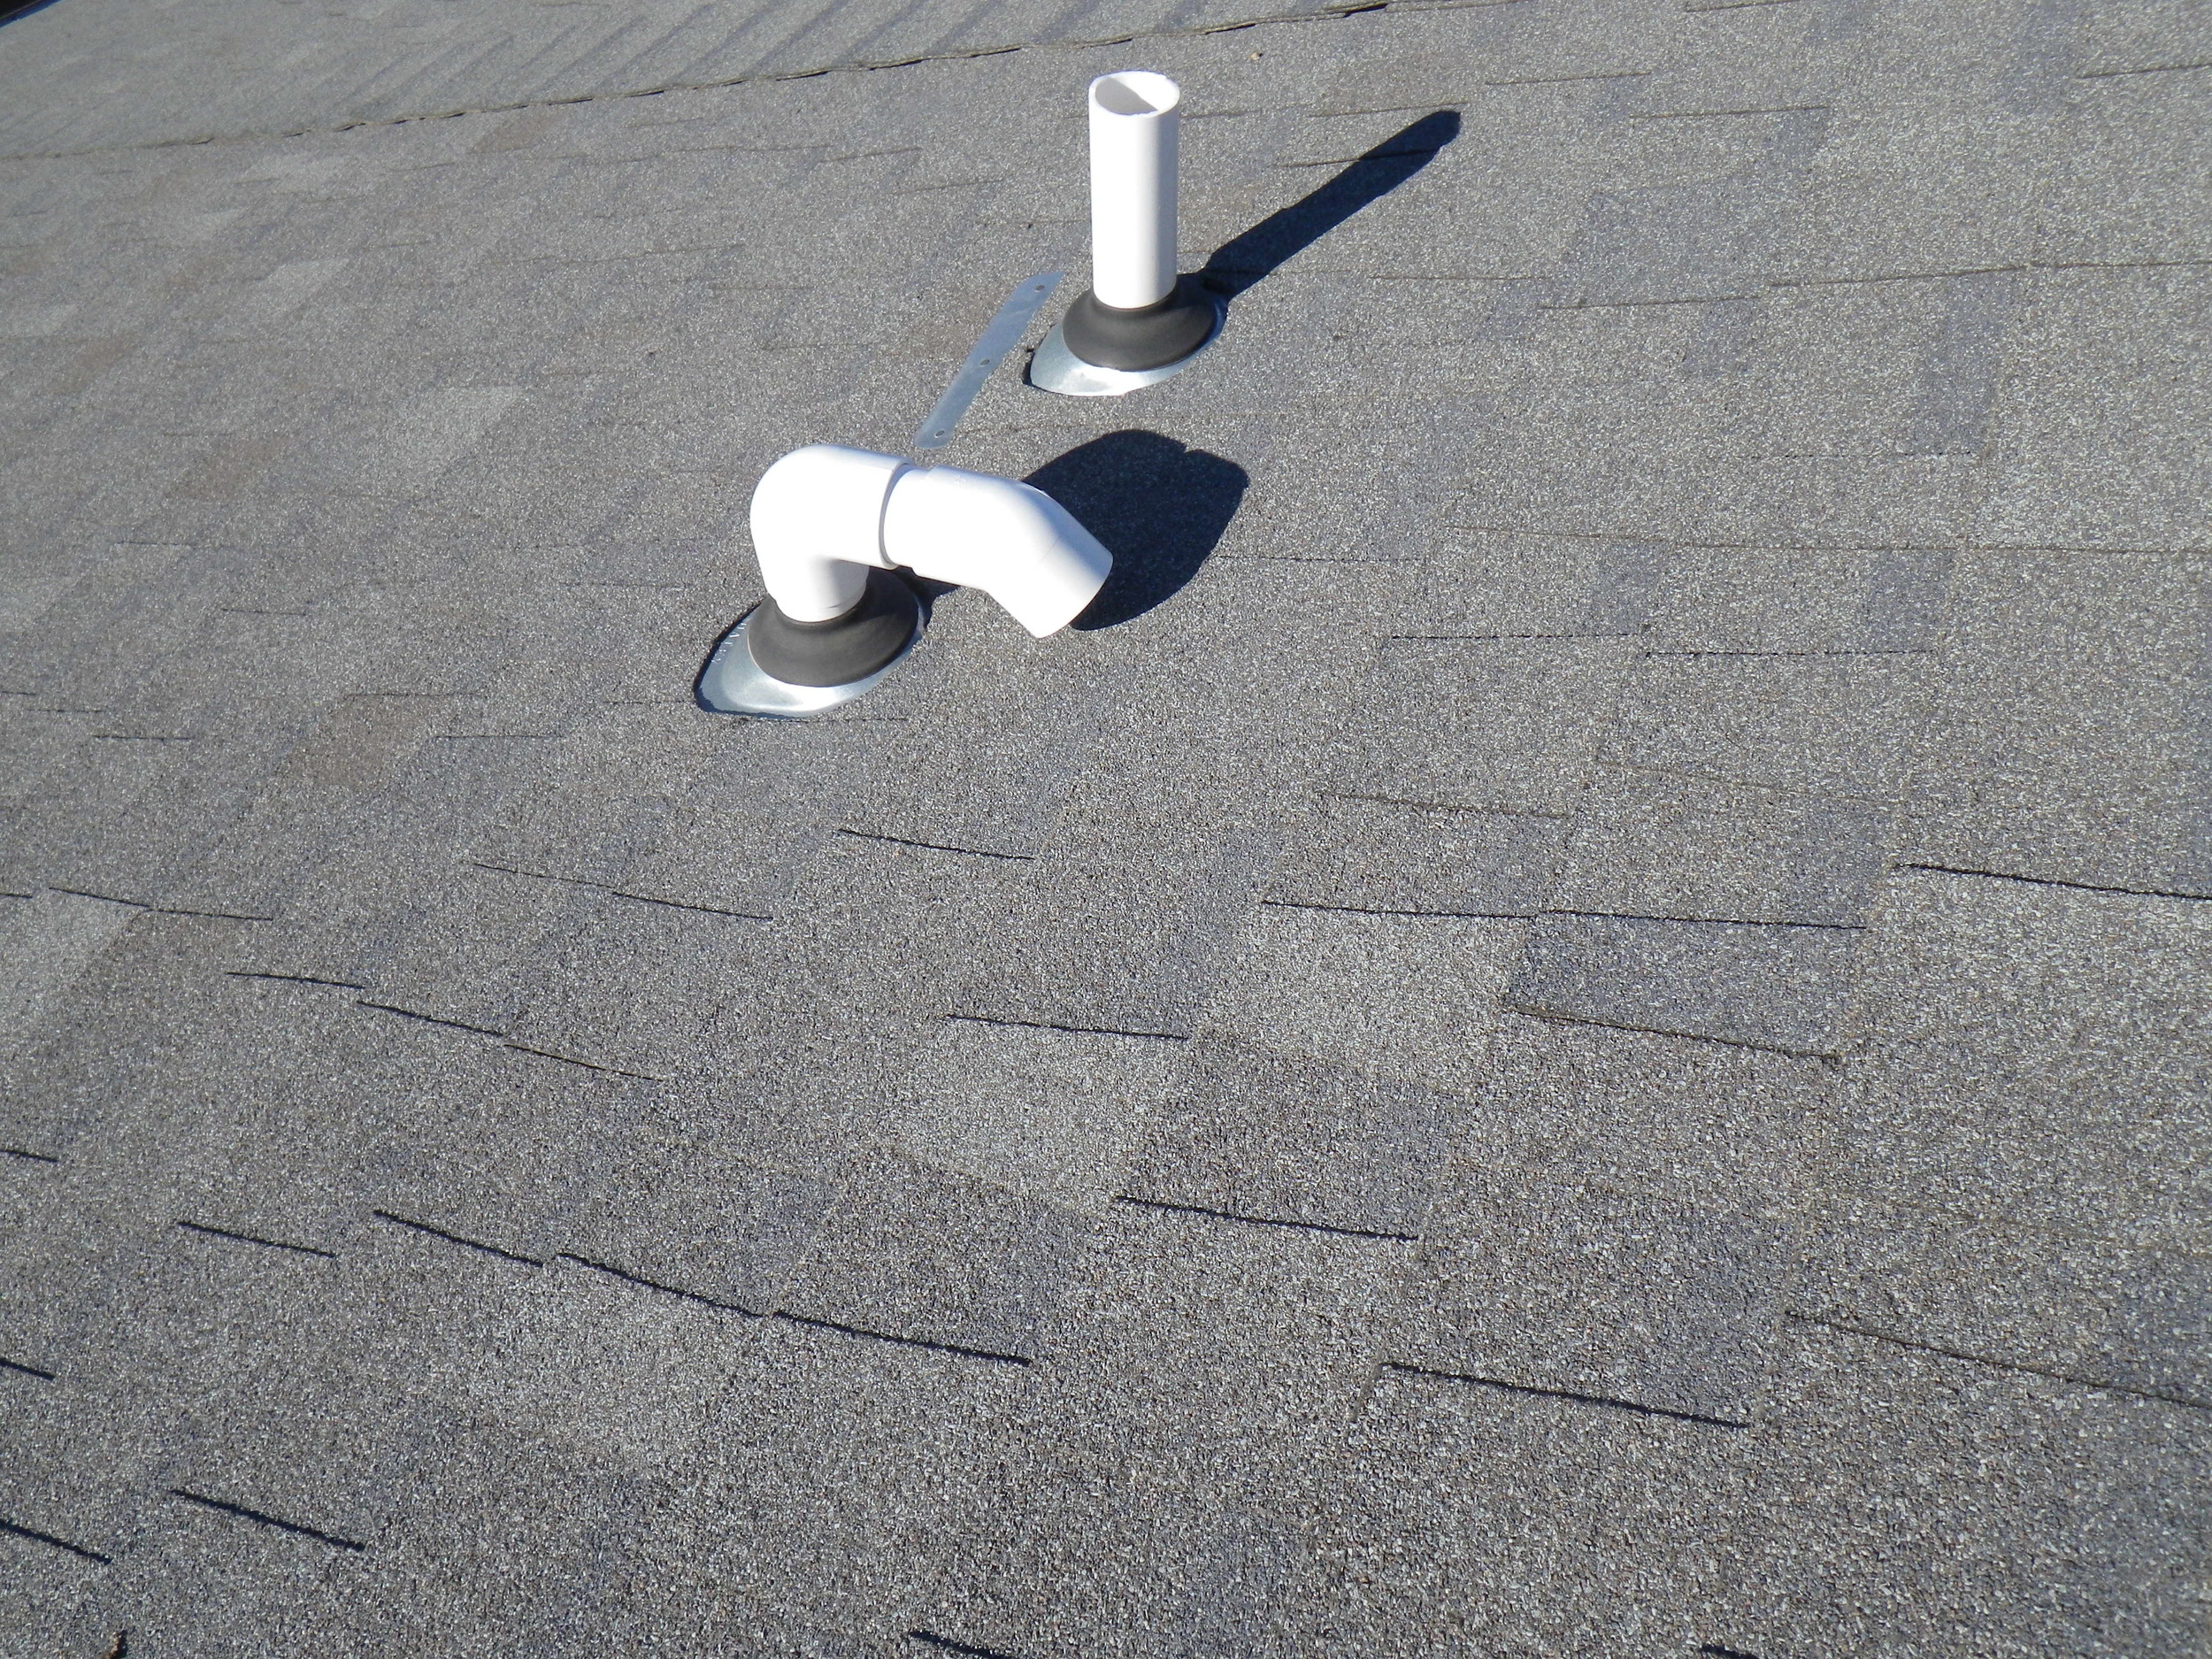
This leads the builders in the valley to occasionally entertain bad ideas on what constitutes good construction. If you take a quick gander at the picture above, you can see a prime example.
The picture was taken on an inspection of a brand new home. Can you see the problem?
Yep, whoever it was that pointed out the air intake (the curved one) is way too close to the roof deck wins a Tootsie Pop.
The intake should be much high off the roof deck (I recommended 12") so that, in the event of snow, it doesn't get blocked. The ultra-high efficiency furnace that is connected to the intake has a sensor that measures how much combustion air is getting pulled in. If it doesn't sense enough air, the furnace will not start.
Bad.
It's winter and we definitely want the furnace to fire off and keep our tushes warm. We also don't want to make a service call (on overtime rate because it always happens that way - Murphy's Law is immutable and irrepressible) to get a perfectly acceptable system working again. And even if you know what the problem is, do you really want to climb onto a snow covered roof to fix it?
This is an easy fix. Add some height to both the exhaust and air intake. Viola, end of this particular problem.
And yes, it should have been caught by the building official but cut them a little slack. Like the rest of us, they're human and can miss something. Yes, it should have been caught by everybody up and down the construction cycle. That's why you hire an inspector, even for new homes-we're the last link in the chain of people (builder, contractors, code official, agent, inspector) that are trying to make you happy in your new home.
Keep that intake clear and stay warm, folks.
Never Trust the Seller's Inspection
Never trust the seller's inspection - not even mine. I know, I guarantee mine but let me tell you a little story about a small house that had a big problem.
I did not do the seller's inspection. I was working for the buyer in a house that was built in the later part of the 1920's. The listing agent had offered to sell the report that his client had to the my client but he, fortunately, wanted independent eyes. No problem.
Everything was tracking pretty normally for a house of that vintage until I got into the crawlspace. Skinny one and I couldn't get to the front half of the home due to the total lack of clearance. I'm skinny but even I wasn't getting there without a shovel - and I deliberately don't carry one on the truck. Same thing with hammers. They both encourage risky behavior in the inspector.
One tool that I do carry into the crawlspace is a 4" awl for probing wood. Even a sound piece of wood can harbor a surprise or two so testing is the best method of determining what's there. A rock hammer is also useful - sometimes you can hear the difference between sound wood and something that is riddled with pests.
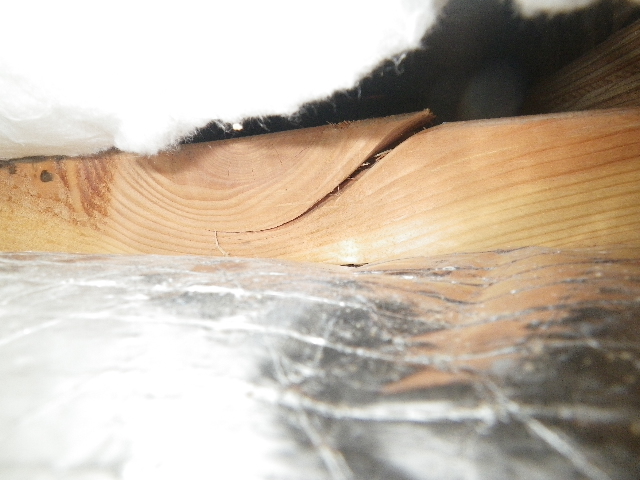
In this case, I knew there was a problem reasonably quickly since white icky stuff (fungus of some sort, obviously) should not be eating the framing members. It's just bad form. Also, might not be too healthy to live around.
Fungus is usually going to grow in high humidity/moisture environments. Dry rot is actually wood-destroying fungus and doesn't happen when things are dry.
If you look at the picture, you can see the handle of the awl. Now, for those that don't know me, I'm not a power lifter. I'm a long distance runner with the arms of a long distance runner. The fact that I could embed that awl to the hilt was not good news. That the main beam dropped 2" because of rot was not good news.
What was really disturbing to me was the buyer was not apprised of these conditions in the disclosures. Which means that the other inspector thought the space was too tiny to get into and didn't try.
Fortunately, my client was a trust but verify kind of investor. Will the deal go forward? Don't know, that's not my part of the job. Mine is to give good, solid information. If the client hadn't retained me, he wouldn't have had the accurate data to make his decision.
Hire the Skinny Inspector
This is a part of an on-going joke about why you hire the skinny inspector.
Today's inspection had me practicing my Houdini routine to get into a crawlspace that the current owner didn't even know was there. I'm guessing her inspector, if he's still around, is due a phone call. Anyway, here's the picture. It was actually pretty darn tight, especially trying to get 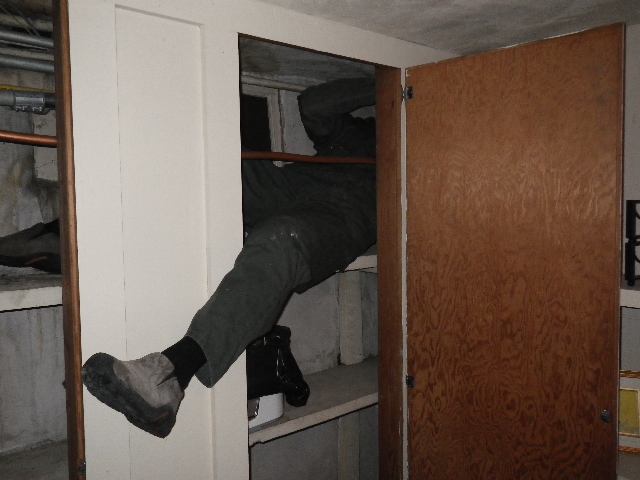 back out. Many thanks to my client for snapping the pic - super-nice folks and a grand old house.
Obviously, one of the recommendations that I'll make is to increase the size of the access. They actually have plenty of room to do so but nobody ever bothered. If nothing else, it will make it easier to add the vapor barrier and insulation that are missing.
In the meantime, it's a win for a skinny inspector-me!
Hope you had as much fun working today as I did.
Prep Season
We've cleared the holidays when everyone in real estate takes some time off. No one wants to move at Christmas so many folks don't have their house on the market, waiting instead until after the New Year. In other words, now. I'm starting to see a strong uptick in seller's inspections as folks prep their house for entry into the market. Something to consider is that the first audience for your home is the other real estate agents. Once listed, they'll be touring your home so that they can be ready to refer their clients to appropriate properties.
If you have any little projects (and maybe some big ones) that you want to complete during the late winter/early spring, talk to your agent about waiting until the projects are complete before putting the house up on tour. First impressions can be critical and you don't want to jump the gun.
And, if your agent has suggested some repairs, I strongly recommend that you consider them. They know what is concerning to the buyer - they work with them daily.
For more advice on sellers inspections, check out my posts here.
Cracked Heat Exchangers
Cracked heat exchangers are not just expensive - they can be dangerous as hell. First, background. A gas-fired furnace (oil, too) has two different air-handling systems. The one most people think about is the blower that moves that wonderful warm air through the house on days where the temps, like today, are in the single digits.
The second system is the air supply for the burning of the gas. The furnace needs this air for combustion. The resulting flue gases are a mix of the air, minus a goodly portion of oxygen, and the fuel, minus a goodly portion of the chemical energy. That's where the heat comes from.
To get it into the house, we need to move the heat from the combustion cycle to the air-handling equipment. That's the role that the heat exchanger plays. It's a shell of metal that contains the noxious gases of combustion. The walls of the exchanger heat up and transfer the heat to the air driven by the blower.
The old furnaces from the 1960's and early 70's had thick shells and some of those old Lennox's can be hard to kill with anything short of a bazooka. Newer furnaces, especially the ultra-high efficiency condensing furnaces, don't last nearly as long. The new ones have much thinner shells and, to create greater surface area for the heat transfer, lots of dimples in the surface. Consequently, they tend to suffer metal fatigue faster than the old furnaces. Failures in heat exchangers have been reported in units that are only 15 years old.
Back to the noxious gases. What happens when the heat exchanger cracks? Well, we no longer have a separation between the gases and our interior air, the atmosphere that we breathe. The flue gases escape into the living 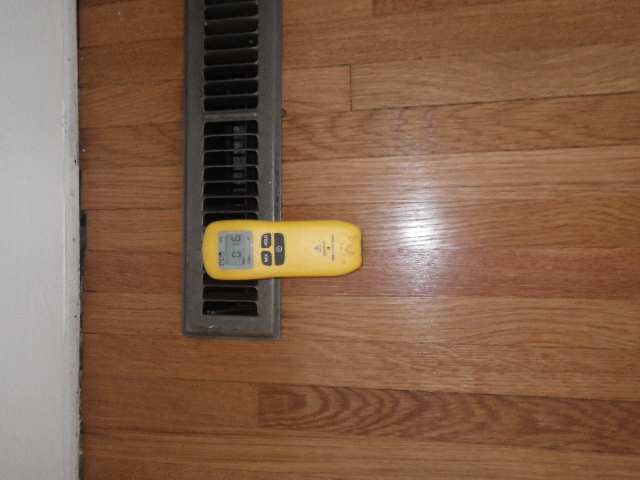 spaces. The principal gas? Carbon monoxide.
The reading on my handy little toy there indicates that the furnace is releasing 16 parts per million of carbon monoxide. As a reference, at levels above 9 parts per million, carbon monoxide begins to affect health. At 35 parts per million, it becomes toxic. These are based on 8 hour exposure cycles, about the amount of time you spend (hopefully) sleeping.
There are a couple of things that you can do to protect yourself. First, have the furnace serviced on a regular basis and make sure you specify that the heat exchanger is inspected for cracks. While you would think that it would be routine, my experience in this area is that it isn't.
Second, install carbon monoxide detectors. They are relatively inexpensive. In older homes, it is perfectly acceptable to use either the plug-in type or ceiling mounted battery operated detectors. In newer homes in Washington State, they are required to be hard-wired into the home.
A special note for people selling homes in Washington State - you are legally required to furnish the home with detectors when you sell your home. This applies even if you are doing it as a for-sale-by-owner (FSBO).
If you are a buyer, I strongly recommend asking the inspector if he uses a carbon monoxide detector during his inspection. They're not foolproof - even if I get acceptable readings on mine, I'll request the heat exchanger be checked by an HVAC specialist - but they are very useful. A good inspector should have one.
Finally, what can be done about cracked heat exchangers? Replacement of the furnace, generally. That's the part that is expensive. It beats being one of the 500 people who die every year from CO poisoning, though.
Crawl Space Access
Crawl space access is one of those completely unsexy things that inspectors get excited about - and with good reason, since we get paid to go in there. Most homebuyers take one look at the spider webs and confined space and pat me on the back. "Good luck, take pictures." seems to the general idea. They're not coming with me. Accesses get placed in all sorts of interesting spots - outside, in the garage, through a basement wall, closets - you name it, someone has put it there.
Okay, not the attic. We'll save the discussion of attic scuttles for another time. . .
The code for crawl space access is pretty specific.
R408.4 Access Access shall be provided to all under-floor spaces. Access openings through the floor shall be a minimum of 18 inches by 24 inches (457 mm by 610 mm). Openings through a perimeter wall shall be not less than 16 inches by 24 inches (407 mm x 610 mm). When any portion of the through-wall access is below grade, an areaway not less than 16 inches by 24 inches (407 mm x 610 mm) shall be provided. The bottom of the areaway shall be below the threshold of the access opening. Through wall access openings shall not be located under a door to the residence.
Did you read all that? No, don't worry. The inspector will manage it. Heck, we're delighted if we actually get a code-compliant hatch in an older home. Some that I've gone through are a half or less of the size above. It's why you should always hire a skinny inspector.
No, the part that will drive the inspector nuts and possibly cost you money (if you're the buyer) or a sale (if you're the seller) is having a perfectly acceptable hatch that isn't accessible.
Don't Cover or Block the Crawl Space Access
Yesterday was a classic example. We have a home with a sloped floor, a large tree five feet from the foundation wall, and no way to check the crawlspace for structural damage because the hatch was in the laundry room. Under the washer/dryer.
Very few inspectors are going to move installed appliances, risking damage to the appliances and the flooring, to get to a hatch. Instead, most will write it up as a defect, mark the structural components as uninspected and leave the buyer guessing about sloped floors.
The longer they guess, the worse the problem will get in their minds.
If you are the seller, please do yourself a favor. First, know where your access is. If it's under equipment, take the time to move things for the inspector.
If it's in a closet, remove your personal possessions to leave it available. Same thing for exterior hatches - don't stack the firewood on top.
Some older homes will have the hatch nailed down. If this is the case, pry it up before the inspector gets there. The odds are that he or she won't take the chance of damaging flooring.
And if you're using screws to hold the covers in place - frequently done on exterior hatches to keep the board tight to the wall - use a standards screw head - no need to go with fancy star-patterned heads. We might not have that particular pattern or size on board the truck. Use a Phillips or square head screw.
The inspector will thank you, and the buyer will get the information they need without the extra worrying. And you move one step closer to a successful sale.
EPA Bans Most Wood-Burning Stoves
Well, it's not like we're not used to the EPA overreaching on regulations so a production ban on the types of wood-burning stoves found in about 80 percent of the homes nationwide with stoves shouldn't be a surprise. The core of the issue is a requirement that wood stoves produce less than 12 micrograms per cubic meter of air of airborne fine-particle matter. The old standard was 15 percent.
You can still use your old wood stove - for now, and depending on region - but if you want to get a new stove, the old one will need to be scrapped out. You can't sell it to another party to recoup some of your outlay for the more efficient burner. I also suspect that the new regulations will increase the cost of the new wood-burning stoves as well though the EPA helpfully provides a list of compliant stoves.
Some areas of the country already ban outright the use of a wood stove during certain weather conditions or seasonally. Puget Sound and the Air Resources Board in that region have done that.
If you are buying a home with a wood stove, I would strongly suggest finding out if the stove is compliant. As an inspector, this isn't going to be part of my routine since there is too great a variety in the stoves themselves. Also, I would keep in mind the fact that the stove that you have may be banned from use should the local jurisdictions decide that it is necessary. Such bans almost invariably involve the traditional fireplace as well.
If you are a seller with a new wood-burning stove that is EPA compliant, I would include that information in the listing. Discuss it with your Realtor to see how best to do this.
For more info, here's the article that I found - EPA Bans Most Wood-Burning Stoves
Don't Break the Cripple Wall
Jack's neighbors called the cops - that's how loud the noise was when the top plate of his cripple wall broke - and they worried that he had shot himself. . Before we get into the details of Jack's case, who knows what a cripple wall is? . . . . Yeah, about what I figured. I'll keep it short.
The cripple wall is a short structural wall built within the crawlspace and designed to provide support to the home. It replaces the old post and beam system that we used in home up through the 1970's. The cripple wall is less expensive to install, less likely to move (it's usually built on a concrete footing), and easier to build. I've put in a picture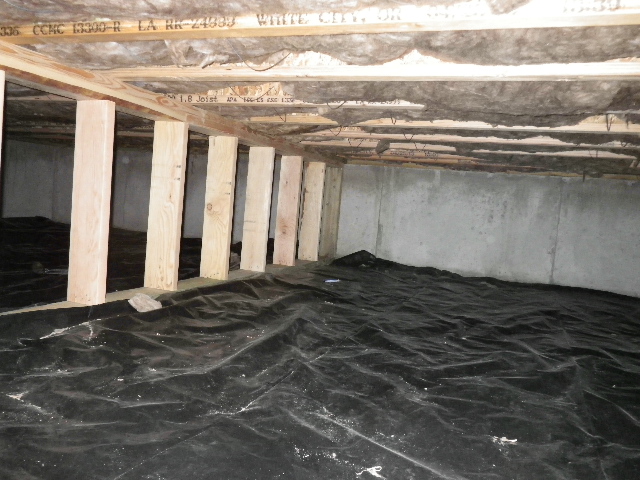 to help you visualize it. As you can see, it looks just like any other framed wall - a sole plate, a top plate, studs. The size will vary depending on how much load needs to be managed but most are either 2x4 or 2x6 pieces of lumber.
There is another similarity to the walls of your home - since this is a structural wall, it needs headers when the studs are removed just as the exterior walls have at the doors and windows.
Most of the time, these are installed automatically to make moving through the crawlspace easier - even for a skinny inspector, trying to squeeze my butt through a 14 inch opening takes a little wiggling.
Sometimes though, I find that either a plumber or the HVAC installers decided that the studs are in the way so they knock them out. No biggie, they think, quite erroneously.
Whoever installed Jack's ductwork knocked out two of the supports so instead of bracing every 16 inches as needed, the top plate spanned 4 feet. That's a long way for a 2x4 to carry load.
The 2x4 also had a knot in it at about the midpoint of the span. Knots are weaker and more prone to split. When they do, it happens fast and sounds explosive.
The effects of the HVAC contractors abuse of the foundation system aren't over. Each part of the system relies on the other parts to perform. Now the studs at either end of the opening are doing more work than they were intended so they will become increasingly likely to fail as well, and, like a set of very slow moving dominos, may affect the whole cripple wall and the interior walls above it in the living spaces.
The good news is that repairs are both possible and not very challenging or expensive. We need more support for the cripple wall on both sides of the ductwork. We also need a fix for the broken top plate - which is where I punt and suggest you need an engineer or really good structural contractor who's done these types of repairs before.
For those that are curious, this house is less than seven years old. If an inspection had been done on it at the time of purchase, the damaged cripple wall likely would have been spotted and fixed.
Blower Door Safety Switch
First, let me explain what a blower door safety switch is.
Your furnace is equipped with a plethora of safety devices - flame rollout sensors, flame sensors (not the same thing despite a similarity in name), limit switches, serviceman's switch - all designed to increase your safety. The blower door safety switch is a simple plunger that, when opened, cuts the power to your gas-fired furnace. Look to the right and you can see what they look like. Depending on the age of your furnace, you probably have one of these. The top one is for a Carrier, the bottom on is for a Ruud (I think).
If you have something 40 years old like a Lennox G8-100, forget it - the switch hasn't been around that long. However, some older models can be retrofitted. The switches are about $30-$50 - it's something to consider but the worst an inspector would be able to say about a lack of the switch is that the unit met the standards for safety at the time of construction but standards have changed and improved with the intervening years.
The purpose of the switch is to prevent your furnace from pulling toxic gases into your home. When the blower runs, it creates a powerful negative pressure zone (to test it, try removing the blower door cover with the unit running - it is much more difficult to do as the blower tries to suck the cover back on.) If you have a leak on the unit releasing carbon monoxide or especially if the furnace is located in the garage, the blower door needs to be tight to the unit to keep the gases from entering the home.
The Most Common Defect with a Blower Door Safety Switch?
Human error in the form of the service technician. The switches are reliable and usually require no maintenance to function properly. But the switch poses a problem for the HVAC tech who is working on the system. The blower compartment usually houses the motherboard for the furnace. To do any work on the board or the associated electronics in the compartment, the door needs to be removed. The system shuts down, precisely as intended.
Except the tech needs it running to perform his diagnostics. So, he tapes the switch closed and gets to work. When he finishes, he puts the cover back on, gives you the bill, and leaves. Forgotten is the piece of tape over the switch. The safety d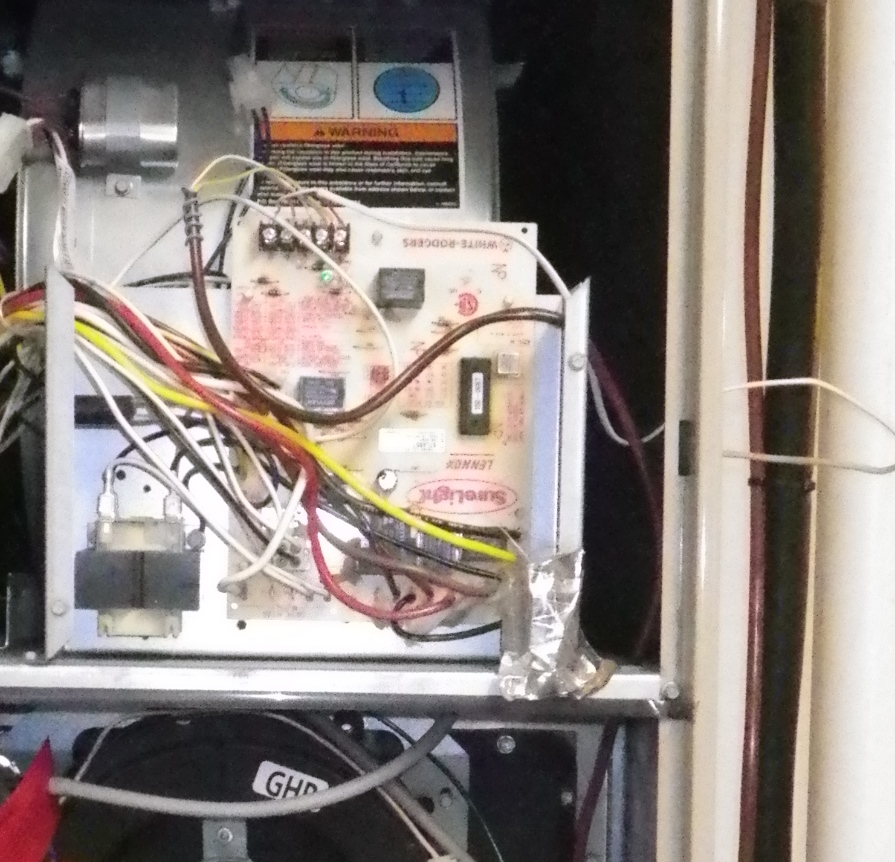 evice is no longer functioning as intended due to predictable human error. I see this about two dozen times every year, making it relatively common.
This is not meant to bash the techs. Especially since I have called more agents than I can count to ask to be let back into a home where I've managed to leave behind a tool. At one point or another, everything single tool has been forgotten, so I get it.
It also strikes me as silly to write this up as a defect and have a HVAC technician return to fix it. A service call at $60-$100 to remove tape? Nope.
I remove the tape. I'm not supposed to - it's outside my standards of practice and puts the liability on me. I calculate it to be an acceptable risk and a nice deed for the day.
I also check to make sure that the furnace is working before I leave. If it isn't, that little piece of tape goes right back on and the whole thing gets written up.
Gas Log Fireplace Maintenance
The next time you snuggle up near the warmth of a gas fireplace, ask yourself when the last time you had someone do maintenance on it. Usually ignored, gas log fireplace maintenance should be done annually just as you do with your furnace. Right, the furnace is do, too, but that's a different post.
Regular Cleaning
Most of the manufacturers of gas log fireplaces and inserts recommend having the system serviced on an annual basis. Most of this you can accomplish on your own if you are reasonably handy. Always remember to turn off the pilot and the gas to the fireplace before working on it.
Use a brush to clean the control space and the burner once you have the unit opened up. Use a very soft bristle brush to clean the logs - they tend to be fragile, so handle with some care.
Some logs, called 'yellow flame logs', require more frequent maintenance. They don't generate as much heat as the blue flamed logs but present an attractive appearance that rivals a traditional wood fire. The yellow color of the flame is a result of the carbon in the logs and, like the wood-burning fireplace, generates soot. Chimneys for these require the same maintenance as the traditional chimney.
The glass can be cleaned with a standard glass cleaner. Be careful with trim work and clean only with a damp rag - using chemicals might etch the finishes and ruin the appearance of the fireplace.
The Vent
Before you start the fireplace for the first time, check to make sure that the vent is clear of debris and dead animals. Also verify that there are no cracks or holes in the flue pipes. Check for condensation the first time you ignite the fireplace. There will be a little bit but it should burn off quickly. If it doesn't, the condensation may combine with the combustion gases and make a weak corrosive solution that can attack the metal of the flue.
Call the Pros!
The manufacturer also recommends annual service of the gas log fireplace by trained professionals. You really do need to have them come out to service the system. While you can clean and maintain the burner components and do a routine inspection of the vents, the pros can check the fuel/air mixture to make sure that the fireplace operates at optimum efficiency, check for gas leaks, and inspect the blower components to ensure the fan operates correctly.
A reminder - if you smell gas, call a service person immediately and describe to them the type and strength of the odor. Follow their instructions - if they say get out - Get Out!
A second reminder - install a carbon monoxide detector even if everything else in your house is electric. Any home with a gas-fired or wood-burning fireplace or furnace should have one.
So, the basics of gas log fireplace maintenance. Do it and enjoy the ambience all winter, worry-free.
Keep Your Water Lines from Freezing!
Yesterday morning, I had the first hard frost of the season on my truck which means it's time again to talk about how to keep your water lines from freezing.
Hose Bibs
I have a comment that is embedded in my report that I use all winter:
In winter weather, it is a good idea to remove hoses from the bibs to prevent damage from freezing.
It is such a common item that we don't even notice it. The hose is still attached to the bib - more often than not, it seems, the hose bib is a frost-free. People like frost-free bibs for good reason - having a pipe freeze and break inside a wall is a major pain. The problem is that a frost-free valve doesn't work if the hose is attached and has water in it.
The frost-free valves work by having the actual shutoff inside the mechanism inside the wall, not at the handle on the outside of the home like the old 1950's style faucets. When you turn the valve off, the remaining water drains from the spigot so that it can't freeze. A hose prevents the draining. If the water is in the line and freezes, it expands and your pipe can rupture.
Make sure you remove any splitters or quick releases - these present the same problems. Also, make sure you don't have a slow leak as the water drips can freeze up the opening acting as a cap.
I recommend putting on covers to the hose bibs for a bit of extra protection. Will the inspector remove it - probably not, in my experience.
Many older homes that lack frost-free valves have shut-offs inside the house. If yours does, use it and then open the valve on the outside. I recommend covers on all non-frost-free valves.
Interior Plumbing
If you are living in the home while it is on the market, most of this is not going to be an issue for you but if you've already moved and the house is vacant but you want the water on, I want to remind you to do a couple of things that will keep the plumbing in safe conditions.
First, leave the heat on. It doesn't have to feel like the Bahamas inside, but you should keep the thermostat set to 55 degrees or higher. Leave all the cabinet doors open below the sinks to allow heat to get to the pipes. If you are not going to leave the heat on at all, you have to fully winterize the home. I will talk about winterization in another post next week . . .
Second, make a decision on whether you want to turn the water off to the home. If you turn it off, crack open the valves and drain the system as best you can. Leave a couple of the faucets open to allow the pressures to stabilize.
If you leave it on, ask your Realtor to check in on your property at least weekly. Some inspectors will also perform this service, so ask around. What you want from them is a visual inspection of the plumbing. In bitterly cold conditions, these visits should be done daily. It may cost a bit on money but I can promise you that the expense is less than that of spraying water and a flooded house.
In extreme conditions, the hot and cold water should be left on a trickle. As anyone who has paid attention to a river realizes, moving water is less likely to freeze.
Plumbing pipes at exterior walls, in unheated basements, and the crawlspace are most in danger. You may need additional heat or a heat tape in these locations. Any plumbing that is in unheated spaces should be insulated but, by the time you move out, it's probably too late unless you want to spend the extra money for your buyer. You should know that Washington State Standards of Practice mandate that we identify these in the report though we are required to recommend upgrading - for now, at least.
Don't forget the fixtures - and the water heater!
The toilet reservoir holds up to three gallons of water. Having that water turn into a block of ice - or worse, having the water heater freeze - can be disastrous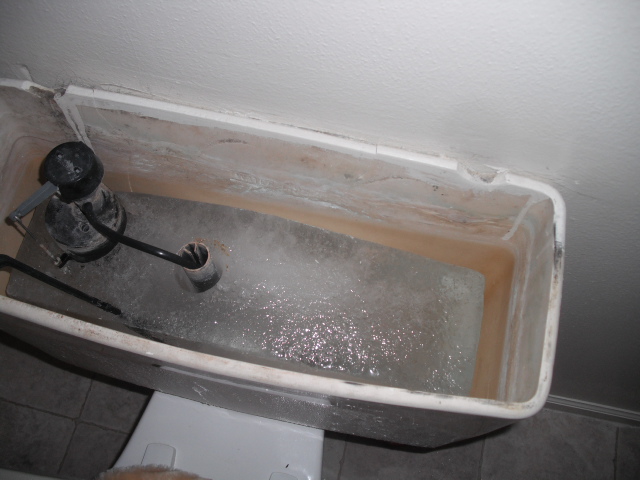 . The picture to the right is from an inspection I did two winters ago. The seller eventually spent thousands of dollars to make the necessary repairs.
If the heat is off, it is imperative that you, at a minimum, drain the toilets. If you turn the water heater off, drain it as well.
And, for what it is worth, the agent had recommended a full winterization. It was excellent advice and would have saved this seller a goodly chunk of cash.
It would have also kept the buyer from freaking out - and to be clear, this inspector is not a big fan of plumbing problems. They often end up more complex than first realized and always seem to involve a combination of multiple trips to the hardware store, bad language, and a good plumber.
A good agent is worth his or her weight in gold - please listen to them if they say you should winterize to keep your water lines from freezing. And follow the other steps above even if you are occupying the home. Especially those pesky hose bibs.
Washington State License #215
Former SBCC Member, Former Chairman State Home Inspector Advisory Licensing Board.
